M5Stack AtomS3 Lite flashed with ESPHome for Home Assistant

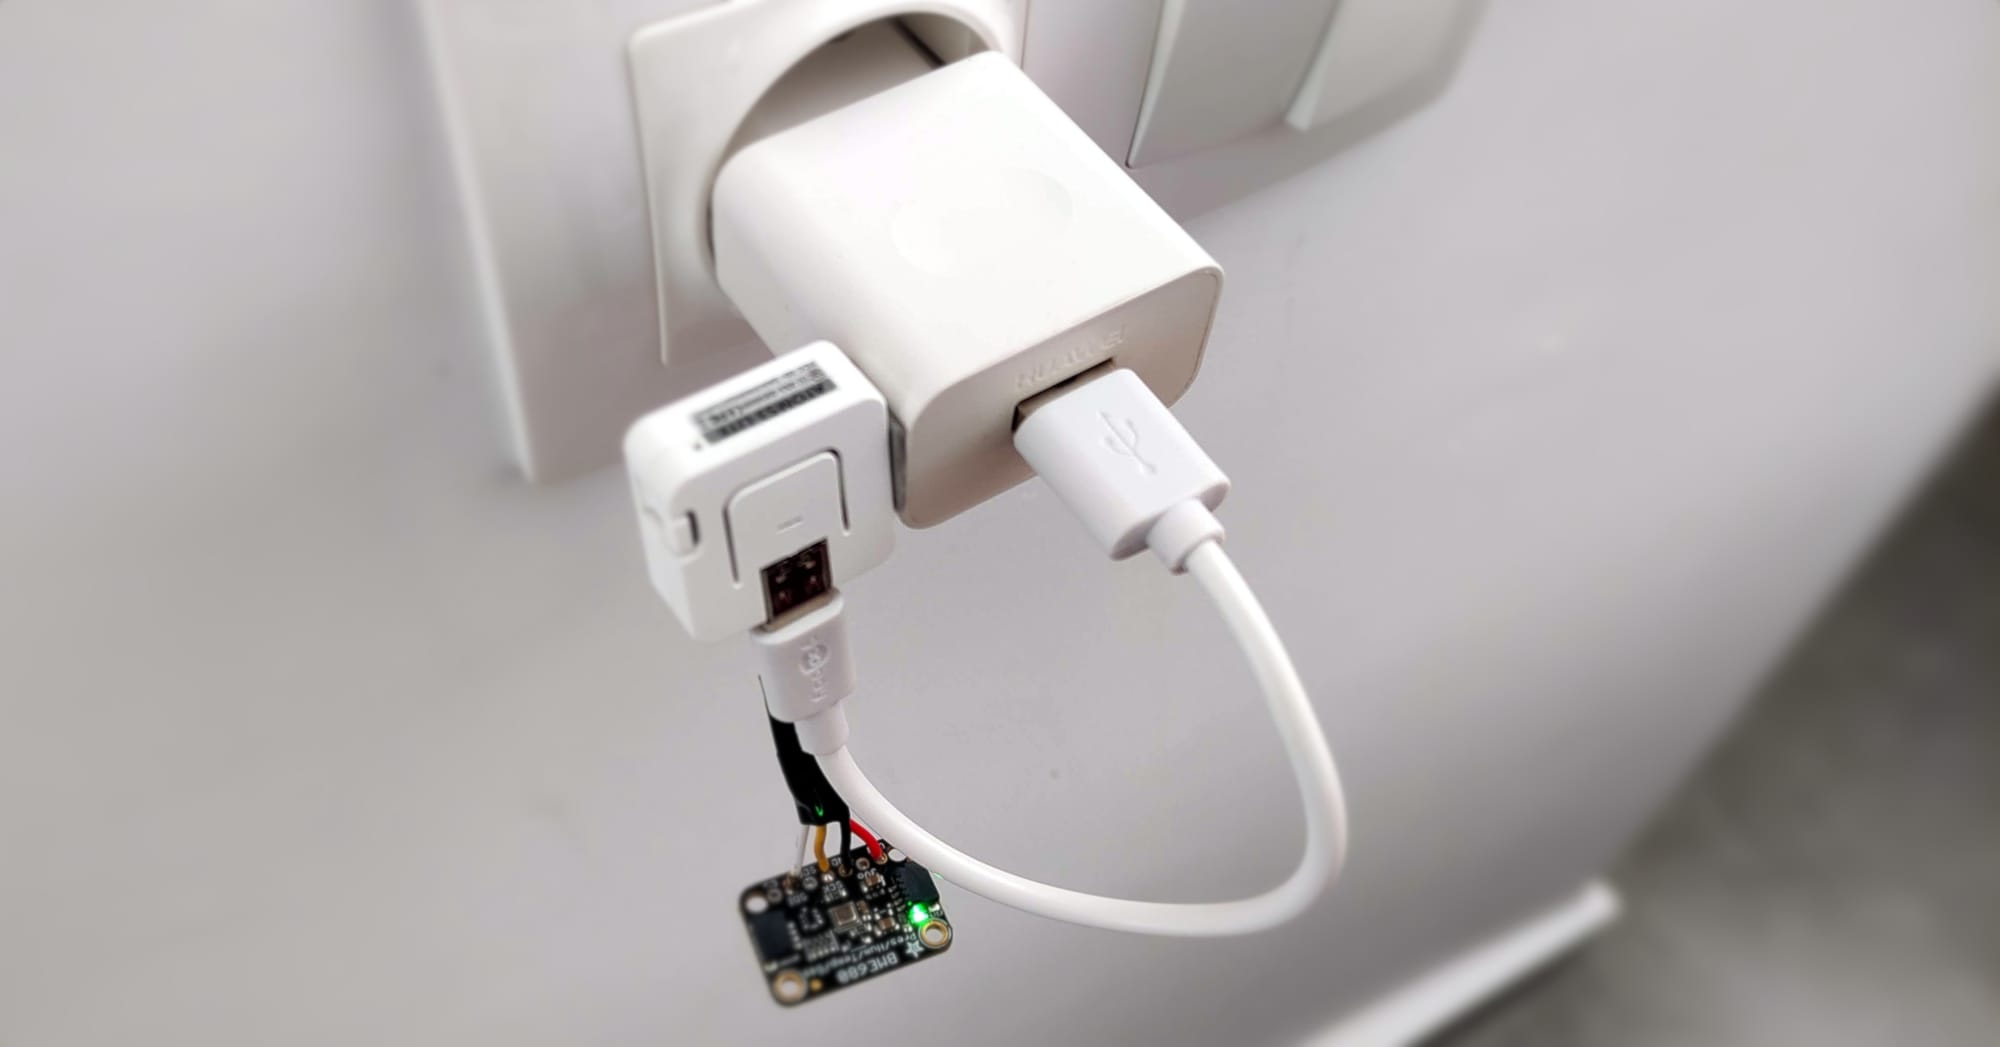
I have an ESP32 board flashed with ESPHome and a BME680 temperature, humidity, pressure and gas sensor attached to it in my bedroom. I couldn't find a decent case for the ESP32 board and I stumbled across the M5Stack AtomS3 Lite board that made perfect sense as a compact and beautiful controller.
Having flashed the ESPHome firmware on the ESP32 board I thought the AtomS3 flashing experience would be as straightforward. My main ESPHome Server is running in Docker and the initial flashing of any board so far happened through the online flasher.
After a lot of trial and error, here is the method that finally worked with the AtomS3, for me at least.
First I installed ESPHome locally on my laptop since the online flasher seems to have trouble with the ttyACM0 connection that the S3 uses. Then I connected the AtomS3 board with a USB cable and while pressing the reset button on the side of the board I connected it the laptop USB port, thus entering programming mode. I used the below YAML configuration to create a bin image in ESPHome:
esphome:
name: esphome-atoms3
friendly_name: esphome-atoms3
esp32:
board: esp32-s3-devkitc-1
framework:
type: arduino
variant: esp32s3
# Enable logging
logger:
# Enable Home Assistant API
api:
encryption:
key: "YOUR_KEY_HERE"
ota:
password: "YOUR_PASSWORD_HERE"
wifi:
ssid: !secret wifi_ssid
password: !secret wifi_password
manual_ip:
static_ip: 192.168.100.55
gateway: 192.168.100.1
subnet: 255.255.255.0
# Enable fallback hotspot (captive portal) in case wifi connection fails
ap:
ssid: "Esphome-Atoms3 Fallback Hotspot"
password: "YOUR_PASSWORD_HERE"
ap_timeout: 15s
captive_portal:
web_server:
port: 80
i2c:
sda: 2
scl: 1
scan: true
id: bus_a
switch:
- platform: restart
name: "BME680 Restart"
# Output that blinks the LED
output:
- platform: template
id: status_output
type: binary
write_action:
- if:
condition:
lambda: return (state);
then:
- light.turn_on:
id: led
brightness: 70%
red: 100%
green: 0%
blue: 0%
else:
- light.turn_off: led
#G4=IR
#remote_transmitter:
# pin: GPIO4
# carrier_duty_percent: 50%
light:
# Enable status LED
- platform: status_led
output: status_output
name: "Status Led"
internal: True
#G35=RGB WS2812C-2020
- platform: esp32_rmt_led_strip
rgb_order: GRB
pin: 35
num_leds: 4
# RMT 0 channels will be occupied by IR
rmt_channel: 1
chipset: ws2812
id: led
name: "Led"
#G41=Button
binary_sensor:
- platform: gpio
name: Button
pin:
number: GPIO41
inverted: true
mode:
input: true
pullup: true
filters:
- delayed_off: 10ms
on_press:
then:
- logger.log: Button Pressed
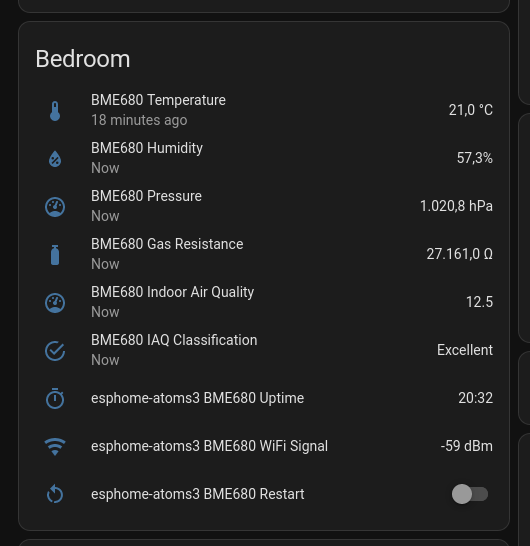
# BME680 sensor
sensor:
- platform: wifi_signal
name: "BME680 WiFi Signal"
update_interval: 60s
- platform: uptime
name: "BME680 Uptime"
update_interval: 60s
- platform: bme680
temperature:
name: "BME680 Temperature"
oversampling: 8x
pressure:
name: "BME680 Pressure"
oversampling: 8x
humidity:
id: "humidity"
name: "BME680 Humidity"
oversampling: 8x
gas_resistance:
id: "gas_resistance"
name: "BME680 Gas Resistance"
address: 0x77
update_interval: 60s
iir_filter: 7x
- platform: template
name: "BME680 Indoor Air Quality"
id: iaq
icon: "mdi:gauge"
# caulculation: comp_gas = log(R_gas[ohm]) + 0.04 log(Ohm)/%rh * hum[%rh]
lambda: |-
return log(id(gas_resistance).state) + 0.04 * id(humidity).state;
text_sensor:
- platform: template
name: "BME680 IAQ Classification"
icon: "mdi:checkbox-marked-circle-outline"
lambda: |-
if (int(id(iaq).state) <= 50) {
return {"Excellent"};
}
else if (int(id(iaq).state) <= 100) {
return {"Good"};
}
else if (int(id(iaq).state) <= 150) {
return {"Lightly polluted"};
}
else if (int(id(iaq).state) <= 200) {
return {"Moderately polluted"};
}
else if (int(id(iaq).state) <= 250) {
return {"Heavily polluted"};
}
else if (int(id(iaq).state) <= 350) {
return {"Severely polluted"};
}
else if (int(id(iaq).state) <= 500) {
return {"Extremely polluted"};
}
else {
return {"unknown"};
}
I then installed the firmware by selecting "Plug into the computer running ESPHome Dashboard" using Chrome Browser and selecting the ttyACM0 connection. Finally, after the flashing ended I had to unplug the board from the computer and plug it back in for the firmware to boot and the board to work and show up in Home Assistant.
The whole package is quite elegant, especially compared to the naked ESP32 board I initially had.